Amazon Seller Central: The ultimate guide for 2025
Ever clicked around Seller Central, wondering if you’re missing something important? This guide shows you exactly what buttons to push.

Amazon has transformed from a simple selling platform into a complex ecosystem used by millions of businesses worldwide. Just last year, almost a million new sellers joined the marketplace. So, it’s not surprising that the competition is fiercer than ever.
But why does Seller Central expertise matter so much? It’s simple. This platform controls every aspect of an Amazon business. From inventory management to customer service, advertising to financial reporting.
Sellers who navigate it confidently consistently outperform those who struggle with its features.
Don’t feel like reading? Listen to this article in our podcast, Commerce Decoded.
What is Amazon Seller Central?
Seller Central is Amazon’s comprehensive dashboard where third-party merchants manage their entire business. It’s where you’ll create listings, adjust prices, and process orders. You can also use it to communicate with customers, track performance, and see support resources.
Individual vs. Professional accounts
Before we dive into the platform itself, it’s important to note that Amazon offers two distinct account types to match your business needs. Which one you choose dictates how many options you get to have in your Seller Central dashboard.
The Individual Plan skips the monthly fee but hits you with $0.99 per item sold. It works great if you’re selling under 40 things monthly or just dipping your toe in the water. Just know you’ll miss out on some advanced selling tools and analytics.
The Professional Plan costs a flat $39.99 each month, no matter how much you sell. This unlocks the good stuff – bulk listing tools, ad campaigns, detailed reports, and prettified A+ Content. You’ll need this plan if you want to sell to businesses, run promotions, or connect through APIs.
The right choice depends on your sales volume and growth plans. But if you sell more than 40 items monthly, the Professional plan pays for itself.
Key differences from Vendor Central
Another thing sellers confuse with one another is Seller Central and Vendor Central. They represent completely different business models.
Seller Central puts you in direct contact with customers. You control pricing, inventory, and fulfillment methods. Vendor Central operates on a wholesale model. Amazon buys from you, then handles retail operations completely.
Vendor Central requires an invitation, while anyone can open a Seller Central account. Also, Seller Central gives you greater control but potentially lower volume than Vendor Central.
Most businesses start with Seller Central due to its accessibility and flexibility. Some later add Vendor Central as a secondary channel. The choice ultimately depends on your business model and relationship with Amazon.
How to set up your Amazon Seller Central account
Getting your account right the first time prevents headaches down the road. Especially since Amazon’s verification process has become increasingly thorough to combat fraud.
Step-by-step registration process
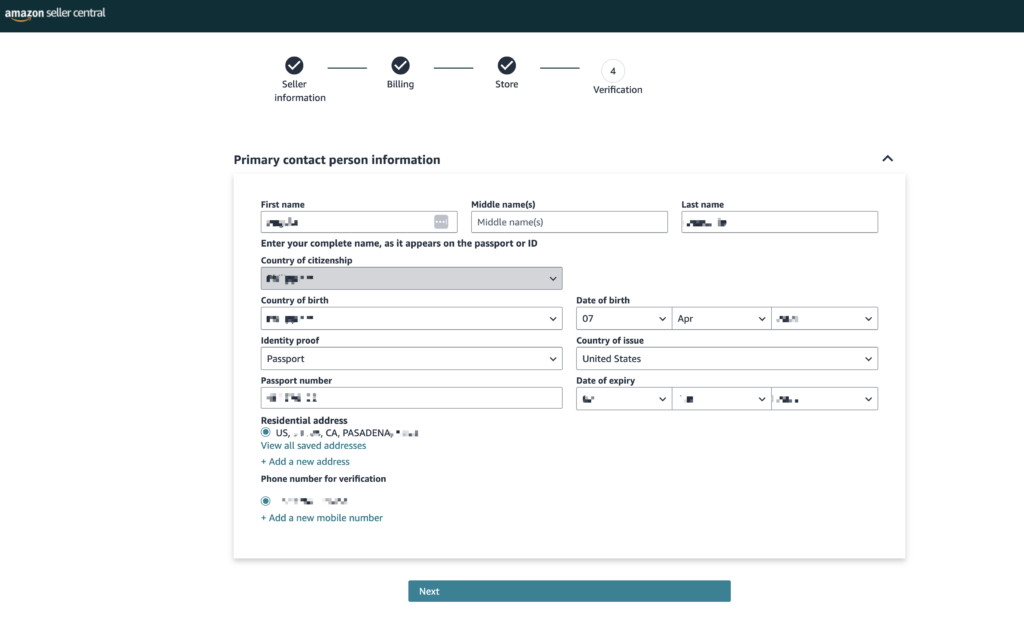
Start by visiting sell.amazon.com and clicking “Sign Up.” You’ll be prompted to enter your email and password (you can use an existing Amazon account or create a new one).
Then you’ll be asked to complete five key sections.
- Business information (if you indicated that you’re registering as a business)
- Seller information (name, address, contact details, ID)
- Billing information (bank account and credit card)
- Store and product information (what you’ll sell)
- Identity verification (document uploads and/or verification call)
The registration process typically takes 1-3 days, but can stretch longer if Amazon requests additional verification. Patience during this stage is essential as Amazon thoroughly vets new sellers.
Required documentation and verification
Have these ready before starting:
- Government-issued ID (passport or driver’s license)
- Recent proof of address (utility bill or bank statement from the last 180 days)
- Bank account details for receiving payments
- Credit card for verification and fees.
Amazon now requires video verification for most new accounts. Either a live video call or a face scan with your ID. This extra step adds time to the setup process, but has dramatically reduced fraudulent accounts in the platform.
Just make sure that all your documents are current, clearly visible, and match your application details exactly. Discrepancies will flag your application for manual review and delay approval.
Seller Central account best practices
Got your account running? Now lock it down tight. Turn on two-step verification for logins and create a password that looks like you fell asleep on your keyboard (just make sure it’s unique).
Tweak your notification settings so you know when something fishy happens. Give team members only the access they absolutely need, and keep an eye on login activity for weird patterns.
Account security isn’t something to skimp on. Many sellers have lost thousands while struggling to recover hijacked accounts. Plus, the recovery process can drag on for weeks.
To save time and effort, you can use FeedbackWhiz Alerts to automate seller monitoring and get alerts for crucial store updates. Just some of the things it can show you are listing changes, hijacker alerts, and account health updates.
How to access and change account information in Seller Central
Need to update your business details? Hit “Settings,” then “Account Info,” and pick what needs changing.
This area lets you update business name, address, tax information, return policies, shipping settings, banking details, language preferences, and public-facing storefront information. Most changes take effect immediately, though some (like bank account updates) require verification periods.
Keep everything current. Outdated details create payment headaches and compliance issues in the long run. Also, Amazon randomly reviews account info, so accuracy matters.
Can you give another person access to your Amazon seller account?
Absolutely, you can add team members without sharing your password. But only if you’re on the Professional selling plan.
Go to Settings > User Permissions, click “Add User,” enter their email address, and select “Send invitation.” You can also assign specific roles and permissions.
This feature is useful for businesses with teams or those working with virtual assistants, agencies, or accountants. You can grant access to specific areas (inventory, orders, advertising) while restricting others (payment information, account settings).
Each person gets their own login and leaves digital footprints of everything they do. This keeps your account secure while you build your empire. Just remember to audit permissions regularly so ex-employees aren’t still lurking in your account.
How to navigate the Seller Central dashboard
The dashboard displays critical information and provides shortcuts to key functions.
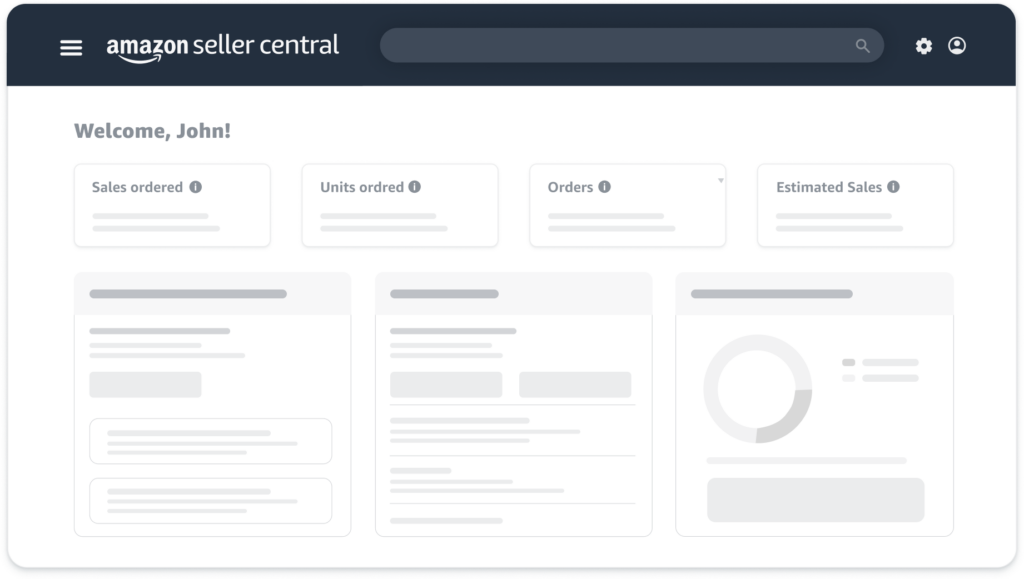
Your Seller Central homepage shows a personalized view of your business at a glance. You’ll see sales summary widgets (units sold, revenue), Buy Box eligibility status, performance alerts requiring attention, recent order updates, and news from Amazon.
The main navigation bar runs across the top and lets you quickly access your Catalog (product listings), Inventory (stock management), Orders (processing and fulfillment), Advertising (campaign management), Reports (business analytics), and Performance (account health).
The layout adapts based on your selling programs and history, showing the most relevant tools for your business model. The widgets are also customizable, so you can prioritize the information most important to your operation.
Understanding performance metrics
Amazon evaluates sellers through several dashboards:
- Sales Dashboard reveals trends in orders, conversions, and shopping behavior.
- Account Health tracks customer service performance, shipping stats, and policy compliance.
- Voice of the Customer highlights product issues before they affect your account.
- Feedback Manager displays customer ratings and comments.
These metrics directly impact your selling privileges and Buy Box eligibility. Low performance scores can trigger listing removals or even account suspensions.
Quick-access tools and settings
Beyond the main navigation, Seller Central also offers shortcuts to streamline operations. Manage Inventory lets you add products, update stock, and edit listings. Manage Orders helps you process sales, issue refunds, and track shipments.
You’ll also find Promotions for creating deals, Reports for downloading data, and Brand tools like A+ Content Manager for enhanced listings (Professional accounts only). Learning these shortcuts dramatically increases your efficiency and response time.
The global search bar at the top is often overlooked but incredibly powerful. It can help you quickly locate specific orders, products, or settings without navigating through multiple menus.
Mobile app capabilities
The Amazon Seller app puts your business in your pocket. Scan barcodes while sourcing, check sales during lunch, and answer customer messages from the couch. You can also get alerts when something’s wrong, tweak prices on the fly, and print shipping labels without touching a computer.
It works on both iPhone and Android, so use whatever you’ve got. The push notifications are handy. They’ll buzz you about urgent stuff even when you’re not checking the app.
The app used to be clunky, but recent updates have seriously improved it. Many sellers now run their day-to-day business through their phones instead of just using the app for occasional checkups. Customer service and order processing work surprisingly well on that small screen.
How to add products in Amazon Seller Central
To begin listing products, navigate to Catalog > Add Products in your dashboard. You’ll choose between matching an existing listing (using UPC, EAN, ISBN, or ASIN), creating a new product detail page, or copying an existing listing to save time with similar items.
Professional sellers have access to other powerful tools like inventory file templates for bulk uploads and AI-powered listing enhancements.
Every listing requires the following essential information:
- product title
- brand (if possible)
- identification numbers
- price
- quantity
- fulfillment method
- description
- bullet points
- high-quality images
All listings can be modified through the Manage Inventory section. You can edit details, adjust pricing, and update stock levels. The search and filter functions help you quickly locate products in large catalogs.
Smart sellers use parent-child relationships to group related products. This approach creates a better shopping experience and consolidates reviews across all variations. It’ll also improve your catalog organization.
Setting up variations properly takes extra time initially but pays off through higher conversion rates and improved discoverability. The Variation Wizard guides you through the process of linking related items logically.
To make things extra easier, you can use InventoryLab to manage your inventory. It streamlines the entire listing workflow with batch creation that lets you add multiple products simultaneously. It also has built-in label printing and shipment creation that sync automatically with Amazon to prevent double-entry.
Order processing and fulfillment
Your fulfillment strategy directly impacts customer satisfaction, operational costs, and account health. Fortunately, Amazon offers multiple options to meet different business needs.
How to manage seller-fulfilled orders in Seller Central (FBM)
With Fulfillment by Merchant (FBM), you handle all shipping, packaging, and customer service yourself. When a new order arrives, you’ll find it in the “Unshipped” section of the Manage Orders dashboard. Here you can view customer details, shipping address, and product information.
Amazon gives you a limited time to fulfill orders based on your promised delivery date, typically 1-2 business days. You can print shipping labels directly through Amazon’s Buy Shipping service (which offers discounted rates) or use your own carrier accounts.
Once you’ve shipped the package, return to Seller Central to confirm shipment and add tracking information. This step is crucial—missing it can negatively impact your account metrics even if you physically shipped the item on time.
How to create and manage FBA shipments in Seller Central
Fulfillment by Amazon (FBA) lets Amazon handle storage, picking, packing, shipping, and customer service for you. To start, convert your listings to FBA in the Manage Inventory section by changing the fulfillment method.
Then, create a shipment through “Send to Amazon.” You’ll tell them what products you’re sending, how many, and how they’re packed. Amazon assigns your stuff to various warehouses based on what they need where.
Last steps: print their shipping labels, box everything up according to their picky rules, and ship to the addresses they give you. Once your stuff arrives and they process it, your items show up with the Prime badge.
Now, I know what you’re thinking: “This is too tedious.”
Fortunately, InventoryLab also makes the FBA shipment process dramatically more efficient by automating the routine parts. It tracks every item in your shipment and helps you create box content manifests that match Amazon’s requirements exactly.
When you prepare shipments through InventoryLab, it communicates directly with Amazon’s API to create shipment plans. Because of this, you can generate accurate labels and update shipping status effortlessly. This integration eliminates the frequent errors that occur with manual entry.
But what truly sets InventoryLab apart is its ability to track costs throughout the fulfillment process. The platform captures your purchase price, shipping costs, and Amazon fees to calculate true profitability for each SKU. Data that’s surprisingly difficult to extract from Seller Central alone.
Common Seller Central challenges and solutions
Even experienced sellers encounter obstacles within the platform. Here’s how to overcome the most frequent issues.
1. Troubleshooting login issues
Login problems typically stem from a few common causes. First, verify you’re using the correct marketplace domain. North American sellers use sellercentral.amazon.com, while other regions have country-specific domains.
Clear your browser cache or try a private browsing window if you’re seeing strange behavior after logging in. Password issues can be resolved through the standard reset process. But be sure you can access the email address associated with your account first.
If you suspect your account has been compromised or suspended, check for notification emails from Amazon. The login help page will often display specific messages regarding account status that can guide your next steps.
2. Resolving inventory discrepancies
When your inventory records don’t match what Seller Central shows, start by examining the “Manage FBA Inventory” dashboard. Compare the “inbound,” “available,” and “reserved” quantities to your records to see where the discrepancy occurs.
Generate Inventory Adjustments and Received Inventory reports to trace specific transactions. These reports show when Amazon received shipments, made adjustments due to damage or loss, or transferred inventory between fulfillment centers.
For significant discrepancies, submit a case through Help > Contact Us with thorough documentation. Include shipment tracking numbers, packing lists, and timestamped photos of shipment contents when possible.
Note that Amazon typically investigates and responds within 5-7 business days.
3. Handling account suspensions
Amazon suspensions fall into three categories:
- listing-level (specific ASINs)
- fulfillment (shipping privileges)
- account-wide.
If suspended, immediately review the Account Health dashboard and any notification emails to understand the exact violation.
Then, prepare a detailed Plan of Action addressing three elements. What caused the problem? What immediate steps have you taken to correct it? And what processes have you implemented to prevent recurrence? Focus on factual, specific information rather than emotional appeals or excuses.
Submit your appeal through the appropriate channel (typically a button in the notification or Account Health section). If your initial appeal is rejected, revise your Plan of Action with additional details and preventative measures before resubmitting.
Next steps
Now that you understand Seller Central’s core functions, it’s time to put that knowledge into practice.
If you’re new to the platform, explore your dashboard and start listing your products. If you’re an experienced seller, review your Account Health and Business Reports to establish your current performance baseline. Identify the metrics most relevant to your business model and create a regular monitoring schedule. Our recommendation is daily for critical metrics, weekly for trends.
Then, to take your Amazon business to the next level, try out Seller 365. This all-in-one software bundle for sellers includes 10 Amazon seller tools for the price of one, just $69/month.
Like we mentioned earlier, you can use InventoryLab to create listings and manage shipments more efficiently. While FeedbackWhiz Alerts keeps watch over your product listings and customer feedback. These tools save hours of administrative work each week. Plus, they’ll save you $200+ worth of subscription fees per month.
They take advantage of tools that eliminate repetitive tasks and give more insights than Seller Central alone can offer.
Ready to go beyond what Seller Central has to offer? Try Seller 365 free for up to 14 days.